
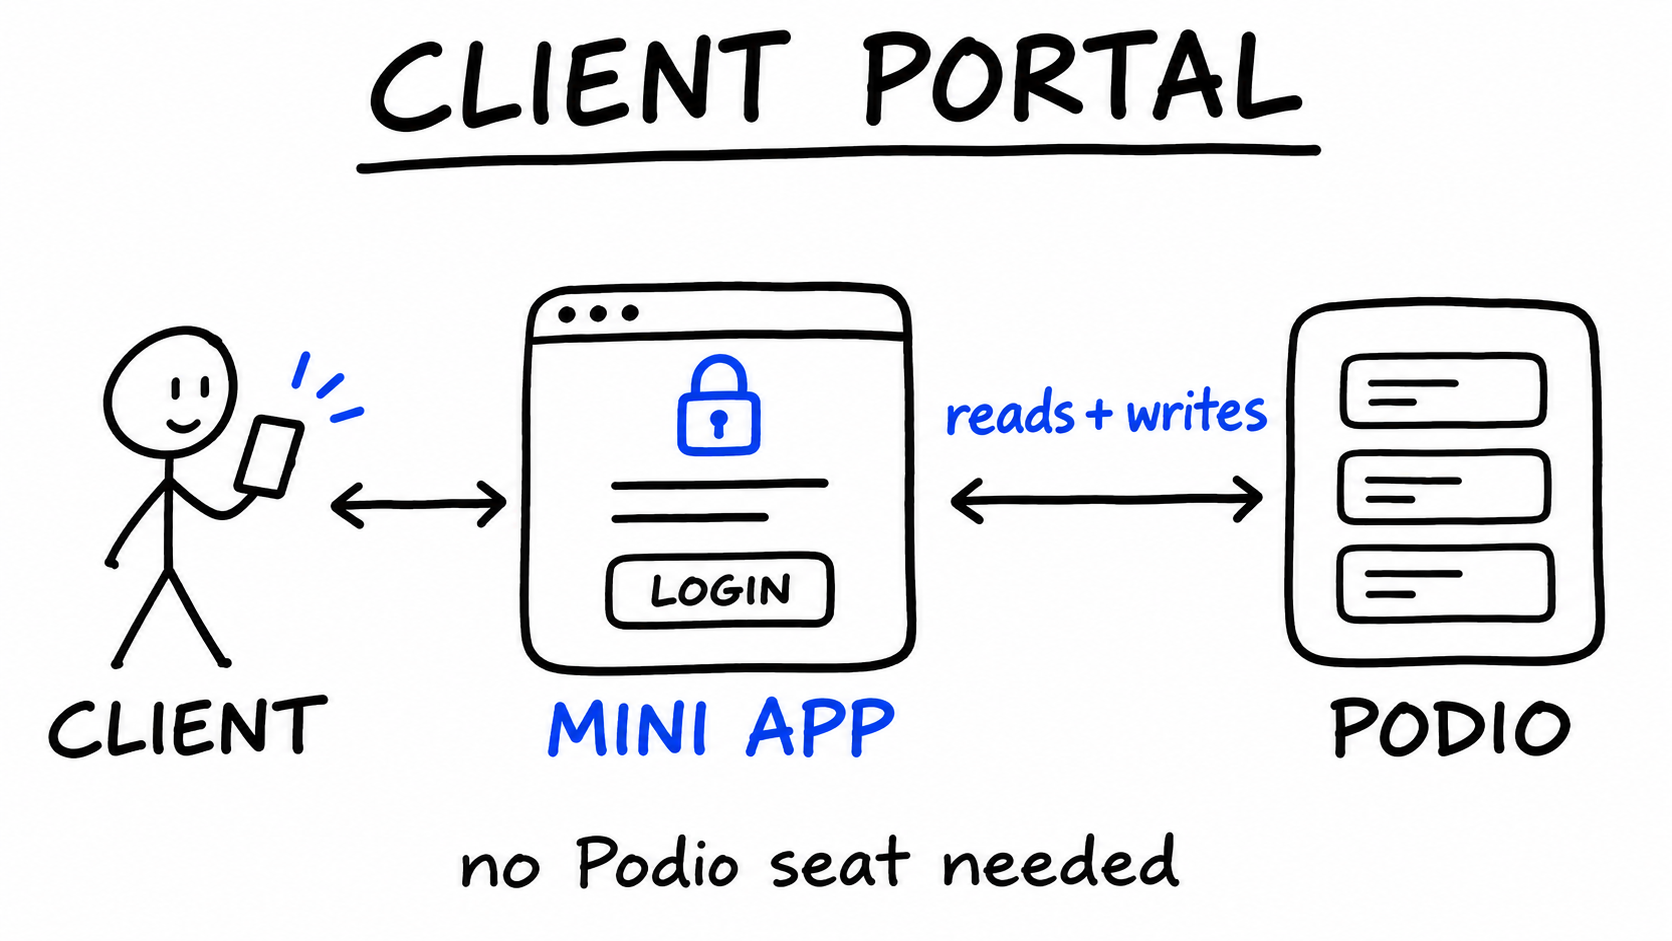
Most Podio teams reach the same point sooner or later. Clients want to see where their work stands, send in requests and drop off files, and the options inside Podio aren't great. You can invite clients into a workspace, which means managing their accounts and hoping no one ever adds an app they shouldn't see. Or you can keep everything on email and copy it into Podio by hand.
ProcFu Mini Apps are the third option. A Mini App is a web app built in ProcFu's point-and-click builder that reads and writes your Podio data directly. Your clients log in to the Mini App, not to Podio, so they don't need Podio accounts and never see your workspace. Podio remains the system of record: everything a client submits lands as a normal Podio item that your team works on as usual.
This guide walks through building a basic portal, with each step tied to the Mini App setting that does the work.
The example setup
Take a service business with three Podio apps:
- Clients: one item per client, with an Email field and a Password field.
- Projects: one item per job, with a Client relationship field pointing to Clients, plus Status and Due Date.
- Requests: change requests and questions, with a Client relationship field, a Project relationship, a Description and a PO Number.
The portal needs four screens: a login, a list of the client's projects, a project detail page, and a form for new requests.
Step 1: Choose how clients log in
Every Mini App starts with an Authentication screen, and the method you pick there decides how the portal knows who is logged in. The options are:
| Method | How it works | Good for a client portal? |
|---|---|---|
| Username / Password (text or md5) | Checks the login against a user field and password field in a Podio app (InfoLobby, Tape, Notion and Google Sheets can also hold users) | Yes, the usual choice |
| MySQL Username / Password | Checks against a table in a MySQL database you connect | Yes, if your users live in MySQL |
| Google sign-in; the email address can be matched to an item in your users app | Yes, if your clients use Google accounts | |
| Link in Url | A secret value in the link (for example ?id=SECRET) is matched against a field in the users app |
Only for low-risk pages; links get forwarded |
| Podio | Podio sign-in | No, it needs a Podio account |
| Simple Password | One shared password for everyone | No, the app can't tell clients apart |
For our example, choose Username / Password with Clients as the Authentication App, Email as the User or Email Field and Password as the Password Field:
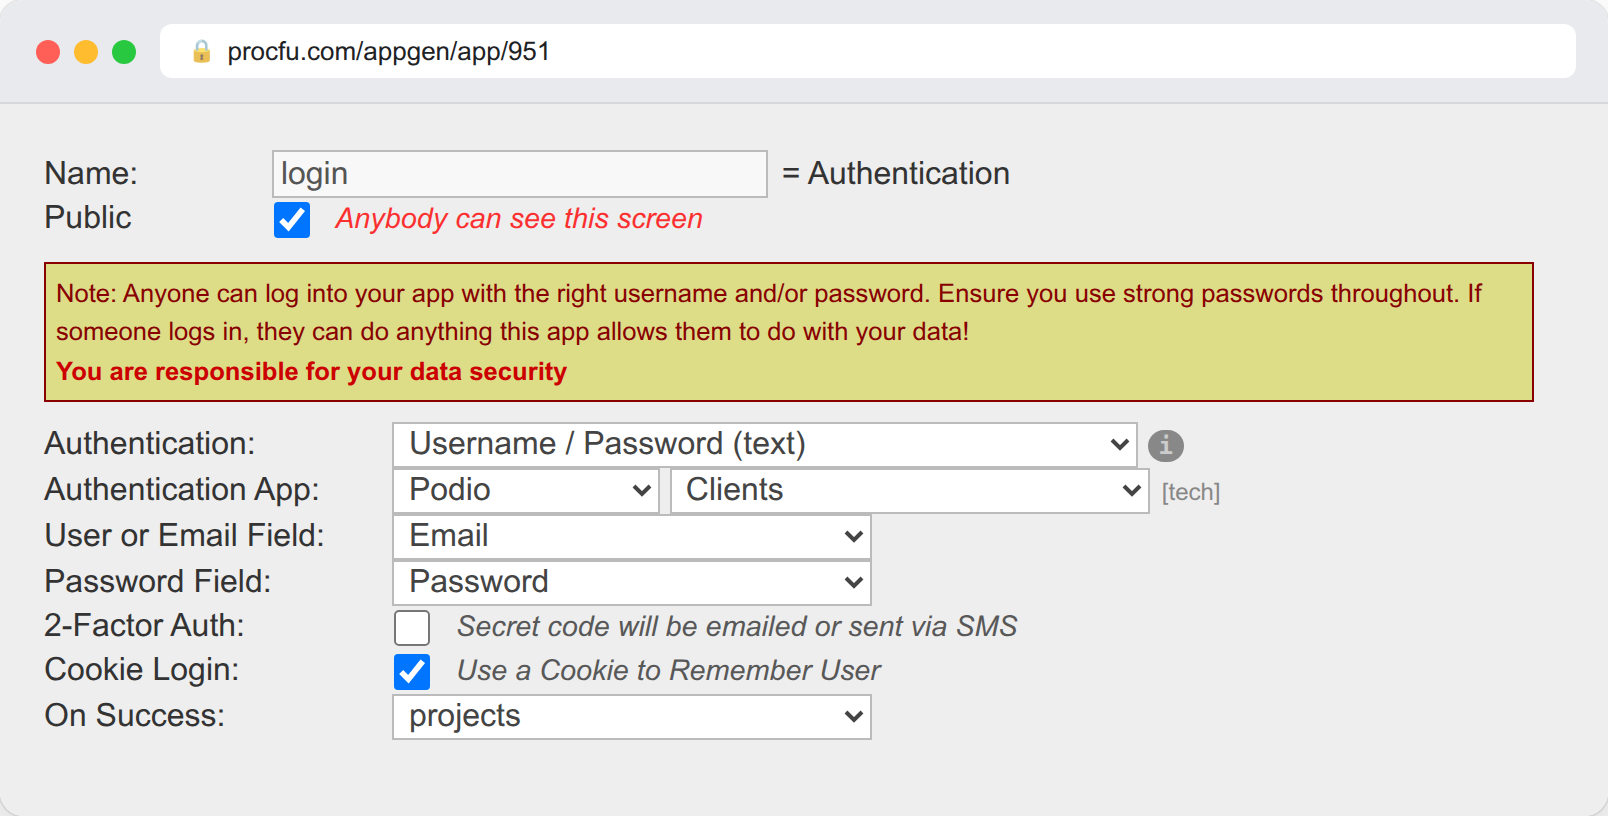
The md5 variant expects the field to hold an MD5 hash instead of plain text, so passwords aren't readable by everyone with access to the Clients app.
The username/password and MySQL methods can also turn on 2-Factor Auth. Pick the field that holds the client's email address or mobile number, and ProcFu emails or texts a code after the password check.
After a client logs in, the Mini App knows their Clients item. It shows up as the magic tokens @[pf_auth_item_id] (the item ID), @[pf_auth_username] and @[pf_auth_item:EXTERNAL_ID] (any field from the client's record). The rest of the portal is built on these.
The On Auth Success and On Auth Fail code events run ProcScript at login, so you can log access attempts or send users to a particular screen.
Step 2: Show each client only their own records
This is the part that matters most, and it doesn't take any code.
Add a Data Summary List screen with these settings:
- Data Source: Podio, Podio App: Projects
- Items From: Related Items
- Related App: Clients
- Relation Field: Client
When Related App is set to the same app you log in against, the list falls back to the logged-in client's item. Acme's contact sees Acme's projects and nothing else. There is no filter to forget on each screen and no view that a client could change.
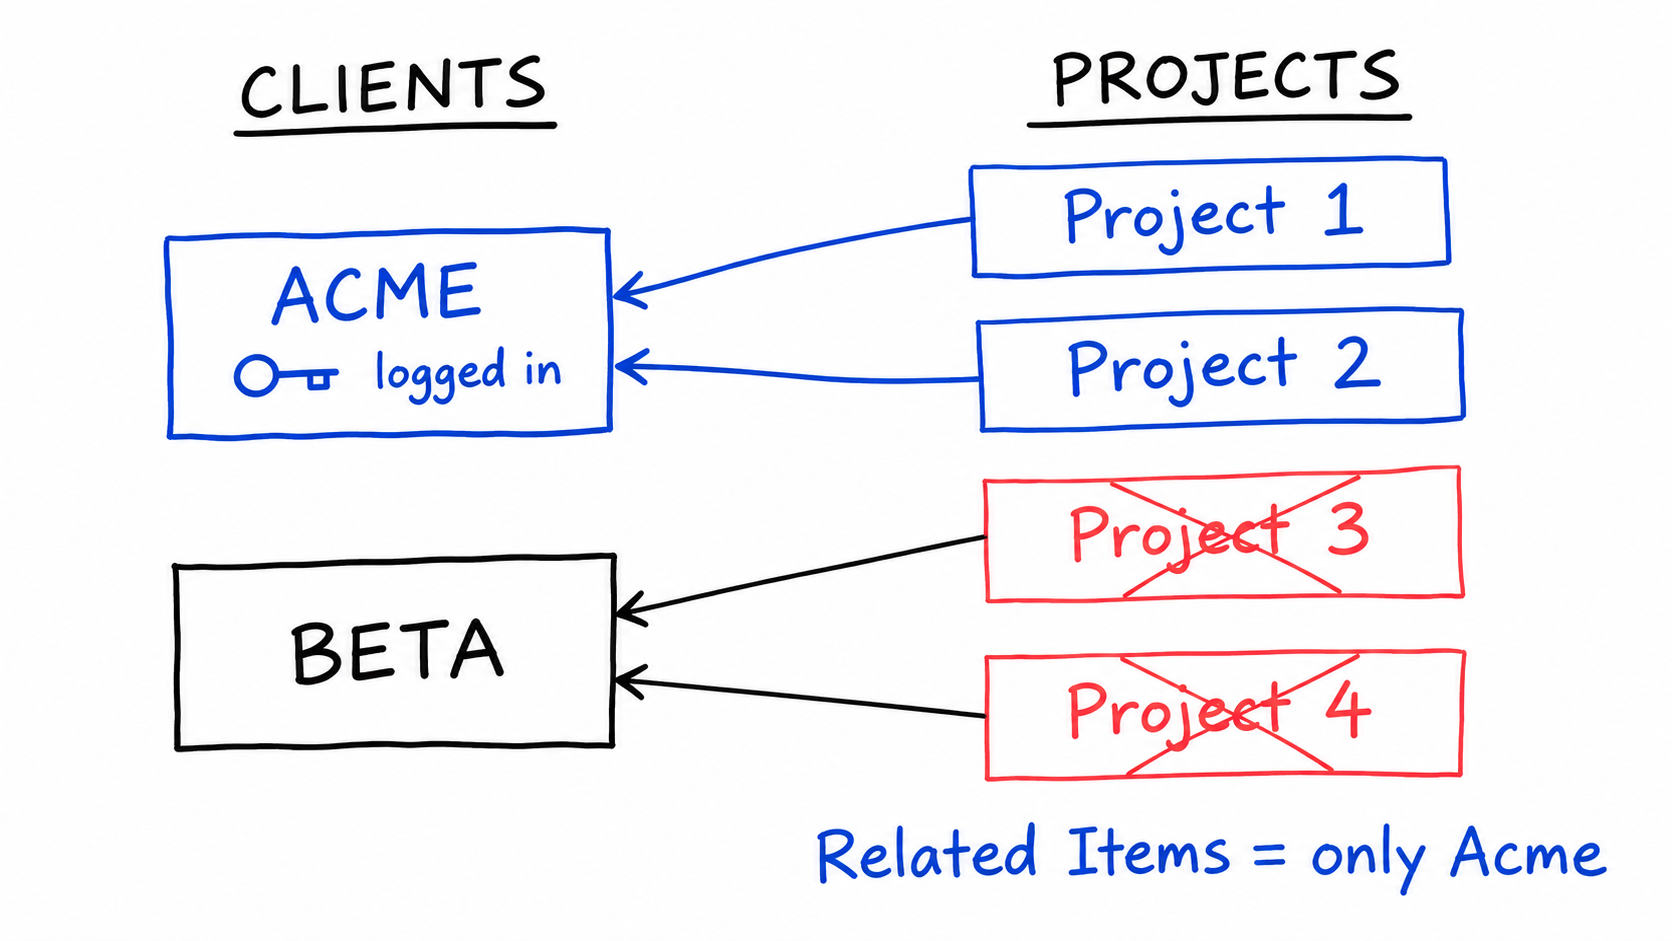
In the builder it looks like this:
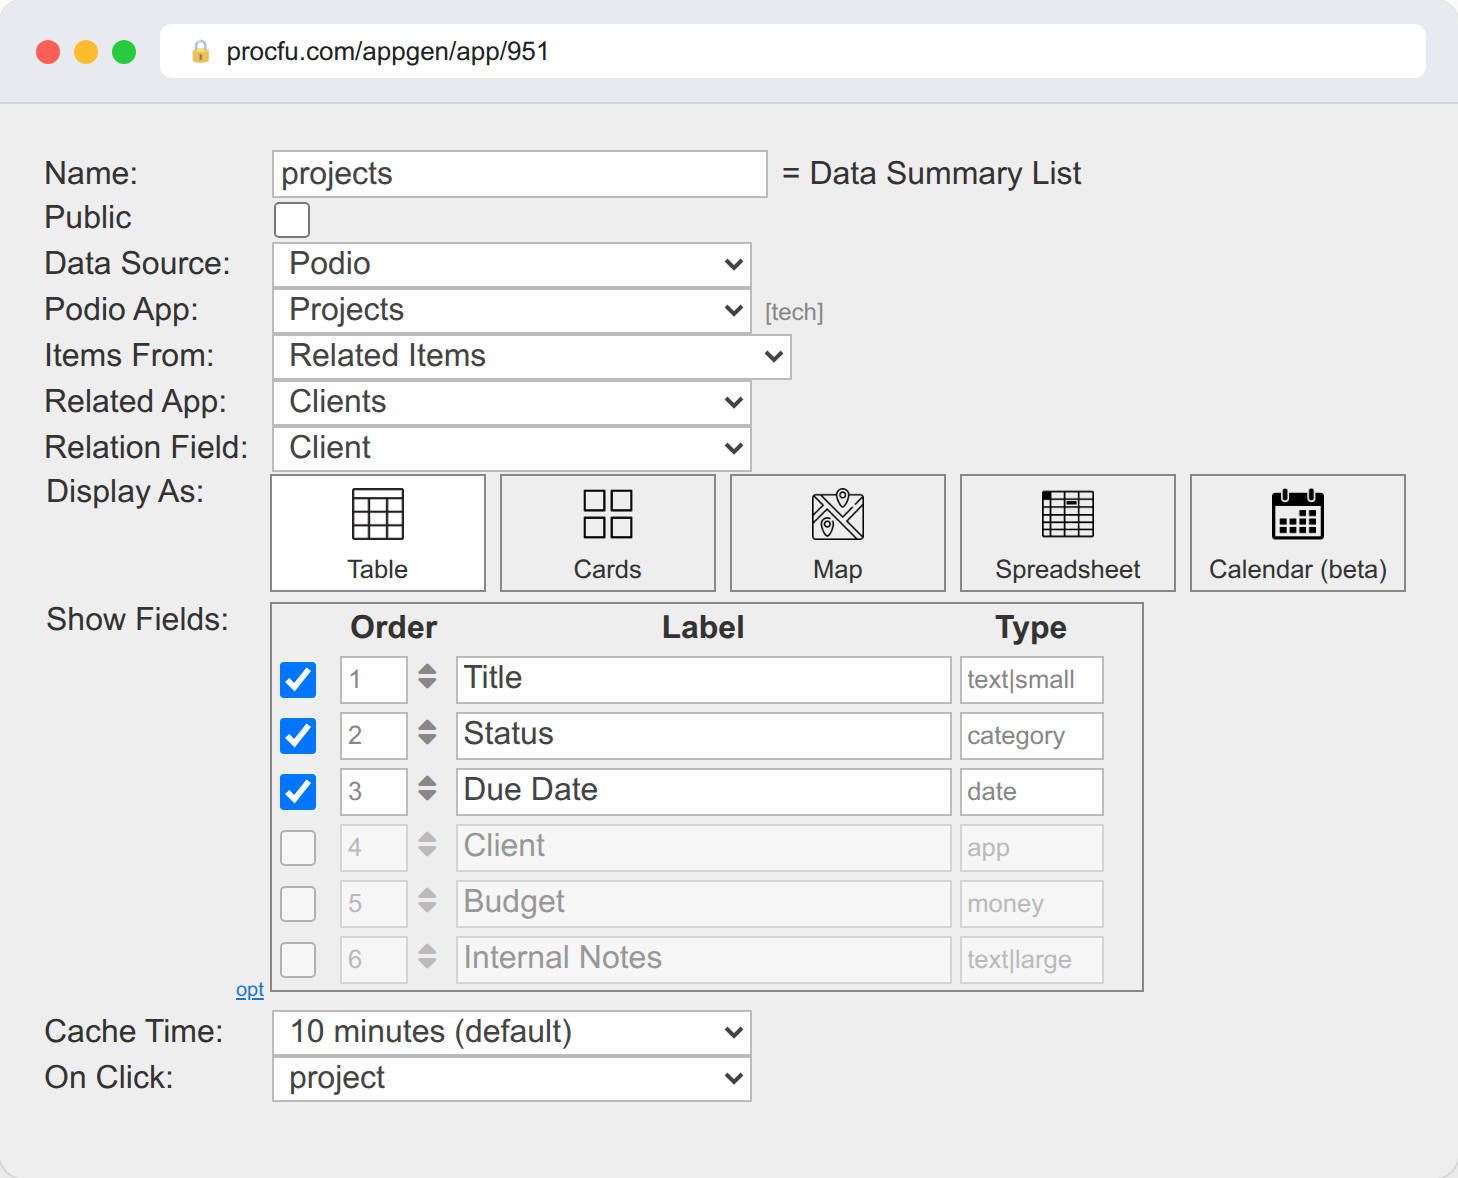
Set Show Fields to what the client should see, perhaps Title, Status and Due Date, and leave out internal fields like budget or notes. Display As can be a table, cards, a map, a spreadsheet or a calendar. Set On Click to the project detail screen.
If you need a narrower list, Related Items with Custom Filter adds a JSON filter on top of the relationship, for example to hide archived projects.
Two security defaults keep clients from browsing beyond their list:
- Item IDs in URLs are obfuscated, so changing a number in the address bar won't open someone else's project. An item has to appear in a list the client was shown before the detail screen opens it.
- Allow URL ID Override on a detail screen turns that protection off. Leave it unticked unless you have a specific reason.
Mark the login screen as Public and keep every other screen private. Private screens send anyone who isn't logged in back to the login.
Step 3: A request form that creates Podio items
Add a Data Detail Record screen on the Requests app with CRUD Mode set to Create. The field list gives each field a Label, Lock, Hide and a Default Value.
The Client relationship is where the portal links the new item to the right client:
- Client: Default Value
@[pf_auth_item_id], Hide ticked - Project: shown, so the client can pick the job
- Description, PO Number: shown
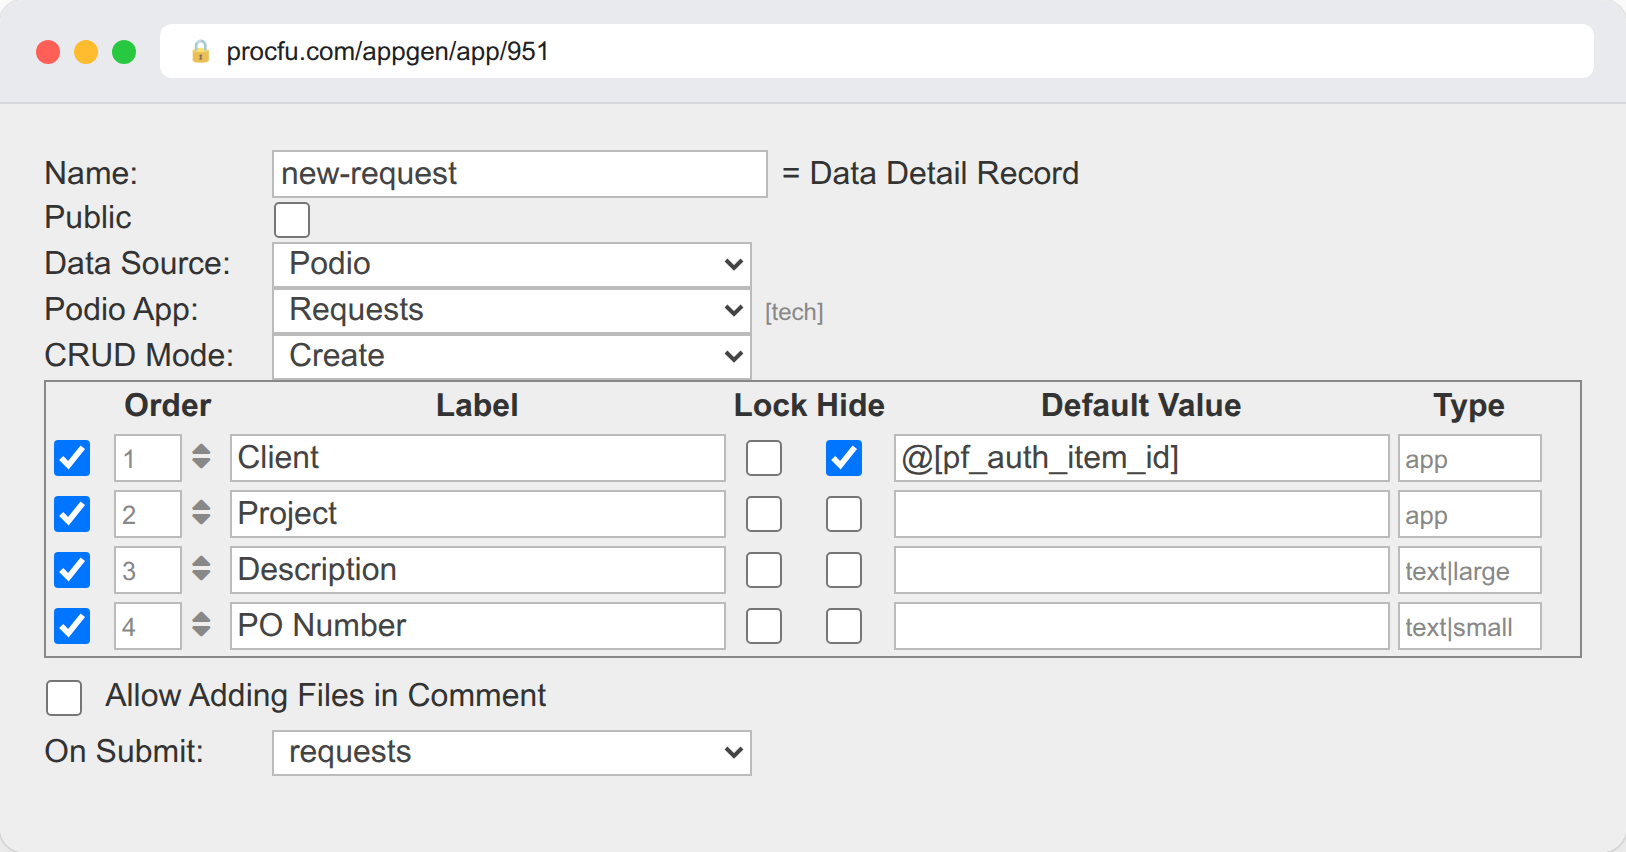
Default values go through token replacement, so every request a client submits is linked to their own Clients item. A hidden field is still part of the form, so also set it on the server in the validation event below rather than trusting the browser. Set On Submit to the screen they should see afterwards, such as their request list.
Field types follow the Podio app: text, numbers, dates, categories, relationships, images and so on. To enforce rules beyond required fields, add an On Submit Validation code event. It runs before the save, and whatever message it returns blocks the save and appears on the form:
$form_values["client"] = $auth_item["item_id"];
IF ($form_values["po-number"] == "") {
    RETURN "Please enter your PO number.";
}
$form_values is keyed by field external ID and can be changed before the save, $auth_item is the logged-in client's record, and form_action tells you whether this is a create, update or delete. After the item is saved, the After Submit event runs, with the new item_id available.
The item is a normal Podio item, so anything you already have that reacts to new items in the Requests app will run, including a Podio Workflow Automation (PWA, formerly GlobiFlow) flow that assigns it or sends an alert.
Step 4: Let clients update records and upload files
For the project detail screen, use another Data Detail Record on Projects, with CRUD Mode set to View or Edit:
- View shows the fields read-only.
- Edit lets the client change the fields you leave open. Tick Lock on fields they should see but not change (Status, Due Date), and Hide on fields they shouldn't see at all. Allow Delete is off unless you tick it.
Files work in two ways. Podio image fields appear as image uploads. A Podio item's own attachments appear as a Files field you can add to the screen, so a client can attach a PDF that ends up on that Podio item next to your team's files.
The Podio-specific options on the detail screen add a conversation thread: Show Comments, Allow Adding Comment and Allow Adding Files in Comment. A client's question then lands as a comment on the Podio item where the team is already working, rather than in somebody's inbox.
Step 5: A home screen with the client's name on it
A Text / Markdown screen makes a simple landing page. Magic tokens fill in the details:
## Welcome, @[pf_auth_item:contact-name]

- [Your projects](@[pf_screen:projects])
- [Send a request](@[pf_screen:new-request])
- [Log out](@[pf_logout])
@[pf_screen:NAME] links to another screen by name, and @[pf_embed:NAME] places a screen inside this one, so you can embed the project list right on the home page. The app's HTML header can change with login state, which is a good place for a menu and a logout link.
If clients care about numbers, a Dashboard screen can show gauges, charts, progress bars, calendars or cards, with values set from code events.
Where the portal lives
A Mini App runs at /widgets/mcapp/[id] on ProcFu, at a friendly slug you choose, or on your own domain. You can also embed it in an iframe on your website. In that case, look at the IFramed option for Google sign-in, because Safari and private windows restrict cookies inside iframes.
Things to decide before you launch
- Who maintains the Clients app. Usernames and passwords live in a Podio app your team can see. Use the md5 option, keep the app in a workspace with few members, and decide how passwords get reset.
- Which fields are internal. Go through every screen's Show Fields list. A client sees exactly what you include.
- Link in Url logins. They are convenient, but anyone who has the link is logged in. Keep them for pages where that doesn't matter.
- What happens after a submit. A portal is only useful if somebody picks the request up. Decide which Podio flow or person handles new items before clients start sending them.
Start with the project list and the request form. Once clients use those, adding a screen for invoices or approvals uses the same pieces: a related list, a detail screen and a default value that ties each record to the logged-in client.